Helping Struggling Writers: Five Steps to Getting Thoughts Down on Paper
Posted by Toni M. Shub, MS, OTR/L on Aug 16th 2017
Transforming thoughts from ideas into a legible, organized, and an interesting piece of written work is often an area of frustration for children on the spectrum or those with learning challenges. Often these same children are able to talk your ear off and tell creative stories and recall intriguing details of events.
So….. Where is the breakdown? This is where you and the writer get to be detectives. The five areas below are the ones that most commonly create that blank stare, or even sometimes tears and frustration when the paper is awaiting the pencil. Any of these areas can also be the culprit for that really interesting and detailed story becoming a jumbled and simplified mess when the pencil hits the paper. Start from the beginning and work through each step until writing becomes easier.
Posture, Pencil Grasp, and Paper Choice
Posture: We tend to underestimate the importance of working posture when writing. Sitting at the right-sized table with feet flat on the floor gives your writer the stability needed to use his/her eyes and hands with precision.
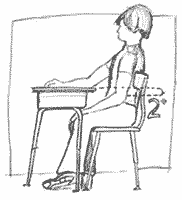
Knees and hips are flexed at 90 degrees and feet are flat on the floor.
The tabletop is approximately 2 inches above the child’s bent elbow.
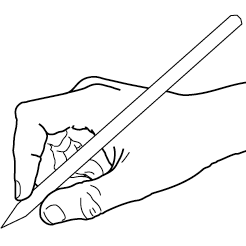
Pencil Grasp and Writing Endurance: The most mature writing grasp is a dynamic tripod with an open web space and wrist held in slight extension.
Some ideas to promote proper grasp include the following:
1. Pinch clothespins, balls of putty, or clay using the pad of the thumb and pad of the pointer finger (these two fingers should form a circle when pinching).
2. Place fingers in proper grasp and practice holding that grasp while writing in resistive materials (e.g. clay tray, sand paper, cornstarch and water, dough, moon sand).
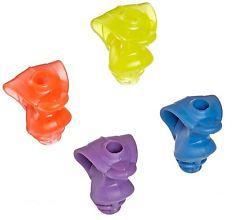
3. Use the Grotto Grip® to place fingers correctly, build correct writing muscles, and add stability.
4. Write on a slant board, 3-ring binder, or vertical surface to put the wrist in the correct position.
5. Practice writing with small pieces of chalk, broken crayon, or end of a paint brush to encourage the use of only three tripod fingers on the writing implement.
Paper Choice: The visual cues, or lack thereof, provided on the paper presented to your writer can make a big difference in legibility and the ability to focus on thinking and writing, rather than where to place the letters. Try different types of paper and see which one is a good fit for your writer.
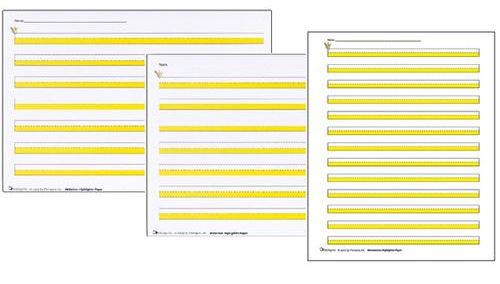
1. For writers still learning letter formation (typically kindergarten and first grade), visual cues and tactile cues tend to provide the most support. For visual cues, you can use highlighter writing paper to guide writers to place their words in the correct area.
For tactile cues, it is helpful to feel the lines with raised lined paper.
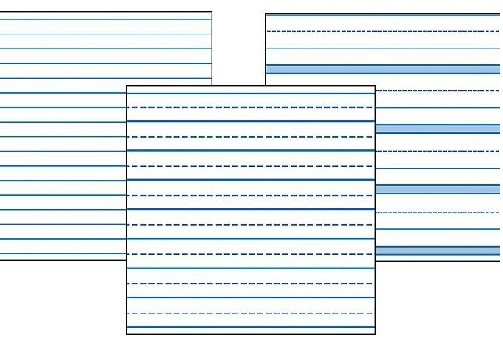
2. For writers who are concentrating on writing to learn - learning how to get thoughts on paper to express thoughts, opinions, and knowledge - it is beneficial to use paper that gives visual cues for spacing, letter size, and adherence to margins. Try RediSpace® this paper provides several visual cues to help students quickly write legibly.
Letter, Word, and Sentence Fluency
Now that your writer is sitting properly, holding the pencil correctly, and has figured out the writing paper that works best, let’s get to thinking, writing letters fluidly, and then putting it together to get those great ideas on paper!
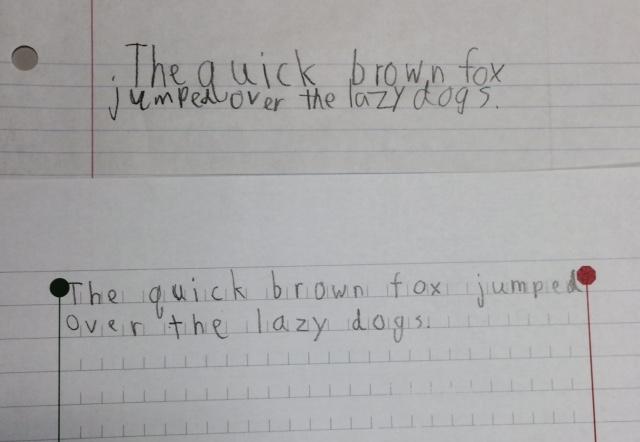
Timed Alphabet: Get your stopwatch, paper, and pencil ready! When you say “Go!” have your writer write the lowercase alphabet at neatly as possible, but as quickly as possible. It is best to use RediSpace® paper for this activity. Place one letter per space and make sure to make tall and short letters within the space marks. The score recorded is the seconds it takes to complete the task minus any errors of formation or placement on the lines. This is your writer’s baseline score (AKA: The score to beat!). Now, try it two more times to try to beat the score! Do this activity until your writer has a score of 30-40 seconds. Practice with numbers as well! To make it more challenging, have the writer do the same task but leave a space after every two to three letters. This will help make spacing, as well as letter writing, more automatic.
Guided Visual Imagery: This activity is done with eyes closed with the instruction to try to “see” the scene. Start with a place such as, “You are in the middle of a green meadow and there are two ways you can travel. You may walk up stairs or crawl through a small tunnel. Which way would you like to go?” Your writer will answer. Ask descriptive questions along the way such as: “What is the weather like in the meadow? What do you see? Does the tunnel have a smell? What does the ground feel like?” You may model when necessary using rich detail and varied vocabulary.
Move-and-Think: 1. Start with just thinking! This can be done lying down, swinging, etc. Pick a category and see how many items your writer can come up with. Words may not be repeated (i.e., farm animals, girls’ names, colors, adjectives, nouns, food you eat for a snack). The goal is to come up with 10 items in a category within a minute. 2. Now add movement! Begin with sitting cross-legged and with a two-part clapping pattern, such as both hands on lap, clap, both hands on lap, clap… Keep the movement going at about one movement per second. Announce the category, “Things you bring to the beach.” Your writer should say one item on each clap. The goal is to keep moving. So, if an item does not come to mind, keep moving and try again on the next clap. If three claps go by without saying an item in the category, try again. Movements can be 2-3 part clapping patterns, jumping jacks, burpees, jump roping, etc.
Word Association: 1. Begin with saying a word out loud (e.g., cloud). Next, your writer says the first word that comes to mind that relates to the first word (e.g.., sky). The object is to say the first word that comes to mind, as fast as possible to connect the word with another word to promote quick word retrieval. At times, your writer will connect a word to the last word they spoke, rather than the word you or their partner says. For example, the first person says green, the second says green bean, the first says slime, connecting back to green. Instead, the first person should have connected to the word green bean and said something like vegetable or dinner. There are no repeats of the same word within the time limit. Take turns go around a circle if doing in the car or around the dinner table with family and/or friends. Add in the movements as in Move-n-Think for more fun and challenge. 2. Writing: Now bring the game to paper. The first person writes a word with a dash or arrow to the right, the next person writes the connected word. 3. Add a time constraint (how many words can be said/written within 2 minutes). The timer is set for 2 minutes. Work together to beat your score.
Gumball Sentences: Let’s have some fun with words! Cut out circles, or “gumballs” from 4 different colors of paper. Each color is a part of speech: noun, adjective, verb, adverb. Think of words for each category, and write one word on each gumball. Be creative! Next turn all the gumballs over so the words cannot be seen. Start with just nouns and adjectives. Pick one from each color and try to come up with a sentence using the words on the gumballs. Do this until it is easy. Be as silly as you want or as theme-based (i.e., Star Wars, trains, etc.) as you want. Next, try other color combinations. Try it with 3 or 4 words, or even more! Finally, go back to 2 words and try writing the sentences. Don’t forget posture, grasp, and paper choice!
Silly Similes: A simile is a phrase used to compare two different items, such as “The dog’s fur is soft like a cotton ball,” or “The soup is as hot as lava.” Using a simile helps readers make images in their minds about what is being read. It helps the writer be more descriptive in accurately representing his/her thoughts on paper. When writing a simile, the words like and as are used a lot!
First, have your writer think of words to fill out each row in the table below, using the following steps:
- Write a noun in the second column
- Write an adjective that describes the noun in the third column
- Write a noun in the fourth column that relates to the adjective
- Finally, write a beginning word to the sentence in the first column.
Complete the whole chart without repeating any words.
| 4. Beginning: word to start a sentence | 1. Noun: person place or thing | 2. Adjective: word to describe the noun in #1 | 3. Noun that is like the adjective in #2 |
| The | cat | fluffy | cotton ball |
| My | hair | stringy | spaghetti |
After the chart is complete, use the chart, one row at a time, to speak silly simile sentences, then write those sentences. For example, The cat is as fluffy as a cotton ball. The second row may be, My hair is stringy like spaghetti. Keep going.
Graphic Organizers
Graphic Organizer Protocol: The use of graphic organizers benefits students’ writing in many different aspects, but most importantly it provides a way to simplify information into an organized visual representation. Research also shows that the use of graphic organizers makes essays better by increasing relational concepts. The use of a graphic organizer serves as a vehicle to take a topic from thoughts to paper. It allows the students to plan before writing and visualize the sequence and organization. Graphic organizers also prompt the student to add details and supporting facts. Various types of writing benefit from using a graphic organizer specific to the writing type. For example, persuasive writing requires the student to state a position with reasons and supporting details, while narrative writing focuses on a sequence of events, details, and personal reactions. Another example is expository writing, which emphasizes facts and details.
The use of graphic organizers needs to be explicitly taught using modeling, feedback, and self-assessment. Every step should be taught and practiced: completing the organizer, writing the introduction and conclusion, and writing the meat of the written assignment with detail and organization. It could take 5-6 times to introduce one type of graphic organizer and, if begun early in the school year, your writer will have quite a toolbox of ways to represent their ideas to help guide more advanced writing. It may take 2-10 weeks for a student to use each type of graphic organizer independently. A week of practice may include:
Day 1: Introduction to the graphic organizer; present two examples using the graphic organizer along with an age-appropriate paragraph.
Days 2-4: Complete the chosen graphic organizer together using the same information modeled (with both examples) and then with a new topic.
Day 5: The writer engages in a guided writing experience with prompts not previously seen; the writer then receives feedback.
See Helpful Links at the end of this article for resources for many graphic organizers. Involve your writer in choosing which one to try first.
Written Expression
Writing from a Model: Writing from a model helps students develop and improve quality and complexity of writing skills across genres. By giving students a framework to begin their writing assignments, students are less worried about how to construct a writing assignment and will be more focused on the content and message. This will increase student engagement in writing tasks and increase self-confidence as a writer. It is important to spend as much time as possible reading examples of age-appropriate, high-quality writing in various genres. This can be accomplished in read-alouds, assigned reading, and class discussions. Just as reading a lot of rhyming books leads to making up rhymes in real life, if children read or hear read a lot of a similar type of genre, their stories will start to mimic the style of the writer(s) with whom they are familiar.
Language-Experience Model: The Language Experience Approach (LEA) is an instructional method that strengthens the connection between reading and writing through the use of students’ individual experiences and oral language. Students naturally have a greater vocabulary with verbal language than written. That can make writing challenging for students who are having a hard time with the more complex parts of writing, such as planning, organizing, spelling, use of conventions, and/or writing speed. Students who have a hard time may shut down, only write a few simple thoughts, or be afraid to share their work with — or in front of — their peers. Using the language experience approach will give students a chance to gain confidence with what they are writing, leading to an improved attitude and outlook on writing tasks.
Begin by discussing the book or topic with the student as an open dialogue. As the discussion continues, ask questions that will make the student think and delve a little deeper. For example, talk about the student’s favorite character or the plot of the book. If talking about the plot of a book, find ways for the student to relate to some part of the plot. Did the characters live on an island? Draw a parallel to the island and a person the student knows who has lived on, has family that lives on, or has been to an island. Continue to ask questions, while keeping the dialogue causal. As the student answers the questions, write the student’s responses and thoughts down on a piece of paper, or use a recorder to play the responses back later. Once enough thoughts are generated, have the student pick the one that resonates the most with him or her. When it is time to write, tell the student that this will be his or her topic and that the student can use the points discussed and written down to help write thoughts on paper.
Record and Transcribe: As mentioned above, oral language often develops much earlier than written language. This often leaves intriguing stories with high-level vocabulary flat and simplified when they hit the paper. Taking away the work environment (desk or table and chair) and writing paper will often tap into that creative storyteller that you know. Get an MP3 recorder/player. Find a comfortable area. For example, lying on the couch, sitting in a tent, propped up in a bean bag chair, or swinging on a swing. Tell your writer to tell you the story, or go in the other room with the recorder and pretend they are telling a friend about a vacation. Next, transcribe and have your writer copy the story from your transcription (you may need to start with just adding the last sentence, then the last two, etc.) or when ready, have your writer transcribe straight from the recording. This allows ideas to flow and takes out the common barriers of remembering letter formation, spelling, use of punctuation, writing endurance, and thinking faster than one can write.
Let’s get to writing and tap in to your child’s creativity! Try these activities at home! Send this article in to your child’s teacher and/or therapist! Send questions and success stories to toni@pathwaysforlearning.com. Good luck on your writing journey!
References
Baxendall, B. W. (2003). Consistent, coherent, creative: The 3 C's of graphic organizers. Teaching Exceptional Children, 35(3), 46.
Capretz, K., Ricker, B., & Sasak, A. (2003). Improving Organizational Skills Through the Use of Graphic Organizers (Unpublished doctoral dissertation). Saint Xavier University & SkyLight. Retrieved August 03, 2016, from EBSCO.
Dicecco, V. M., & Gleason, M. M. (2002, July/August). Using Graphic Organizers to Attain Relational Knowledge From Expository Text. Journal of Learning Disabilities, 35(4), 306-320. doi:10.1177/00222194020350040201 Fisher, D., & Frey, N. (2007). Scaffolded Writing Instruction: Teaching With a Gradual-Release Framework (Teaching Strategies). New York: Scholastic.
Fisher, D., & Frey, N. (2003). The language arts workshop: Purposeful reading and writing instruction. Upper Saddle River, NJ: Merrill Prentice Hall.
Fisher, D., & Frey, N. (2003). Writing instruction for struggling adolescent readers: A gradual release model. Journal of Adolescent and Adult Literacy, 46, 396-405.
Karnowski, L. (1989). Using LEA with Process Writing. The Reading Teacher, 42(7), 462-465.
Merkley, D. M., & Jefferies, D. (2000). Guidelines for implementing a graphic organizer. The reading teacher, 54(4), 350-357
Frey, N. (2011). The effective teacher's guide: 50 ways to engage students and promote interactive learning. New York: Guilford Press
Sáez, L., Nese, J. F., Alonzo, J., & Tindal, G. (2016). Individual differences in Kindergarten through Grade 2 fluency relations. Learning and Individual Differences, 49, 100-109. doi:10.1016/j.lindif.2016.05.020
Stall, L. A. (2001) Writing models: Strategies for writing composition in inclusive settings. Reading & Writing Quarterly, 17, 243-248.